Notifuse – Hướng dẫn quản lý thông báo dễ dàng
Trong thế giới phát triển ứng dụng hiện đại, việc gửi email và quản lý thông báo là một phần không thể thiếu của hầu hết các sản phẩm phần mềm. Từ email xác thực tài khoản, thông báo đặt hàng, đến newsletter marketing – tất cả đều đòi hỏi một hệ thống gửi email đáng tin cậy và dễ quản lý. Tuy nhiên, các giải pháp thương mại như Mailchimp, SendGrid hay Mailgun thường đi kèm với chi phí cao và vendor lock-in khó tránh khỏi.
Notifuse ra đời như một giải pháp mã nguồn mở, tự triển khai (self-hosted) giúp bạn kiểm soát hoàn toàn hệ thống gửi email và thông báo với chi phí chỉ bằng một phần nhỏ so với các dịch vụ thương mại. Với tính năng drag-and-drop email builder, quản lý danh bạ nâng cao, phân tích real-time và API mạnh mẽ cho transactional email, Notifuse đang trở thành lựa chọn hàng đầu cho các developer và doanh nghiệp muốn tự chủ về cơ sở hạ tầng thông báo.
Trong bài viết này, chúng ta sẽ cùng khám phá Notifuse từ A đến Z: nó là gì, tại sao nên chọn Notifuse, cách cài đặt từng bước, và hướng dẫn sử dụng cơ bản với ví dụ code thực tế.
Notifuse là gì?
Notifuse là một nền tảng email marketing và thông báo mã nguồn mở, tự triển khai được thiết kế để giúp doanh nghiệp gửi newsletter và transactional email với chi phí thấp hơn nhiều so với các dịch vụ truyền thống. Được xây dựng với kiến trúc hiện đại, Notifuse cung cấp đầy đủ tính năng enterprise-grade mà không bị giới hạn bởi pricing tier hay số lượng subscriber.
Kiến trúc và công nghệ
Notifuse được xây dựng trên Go (Golang), một ngôn ngữ lập trình hiệu suất cao, đảm bảo hệ thống có thể xử lý khối lượng email lớn với tài nguyên tối thiểu. Backend sử dụng PostgreSQL làm cơ sở dữ liệu chính, với kiến trúc multi-tenant độc đáo: mỗi workspace có database riêng để tránh các vấn đề multi-tenant truyền thống.
API của Notifuse là 100% stateless, cho phép chạy nhiều instance song song phía sau load balancer để scale horizontally. Điều này cực kỳ quan trọng khi số lượng email cần gửi tăng lên hàng ngàn hoặc hàng triệu mỗi ngày.
Core Concepts
- Workspaces: Môi trường độc lập để tổ chức hoạt động email theo project, client hoặc business unit. Mỗi workspace có database riêng, đảm bảo isolation hoàn toàn.
- Email Providers: Notifuse không tự gửi email trực tiếp mà tích hợp với các email service provider (ESP) hàng đầu như Amazon SES, Mailgun, Postmark, Mailjet, và SparkPost để đảm bảo deliverability tối ưu.
- Contacts & Lists: Hệ thống quản lý subscriber database với custom fields, segmentation mạnh mẽ, và list management tools.
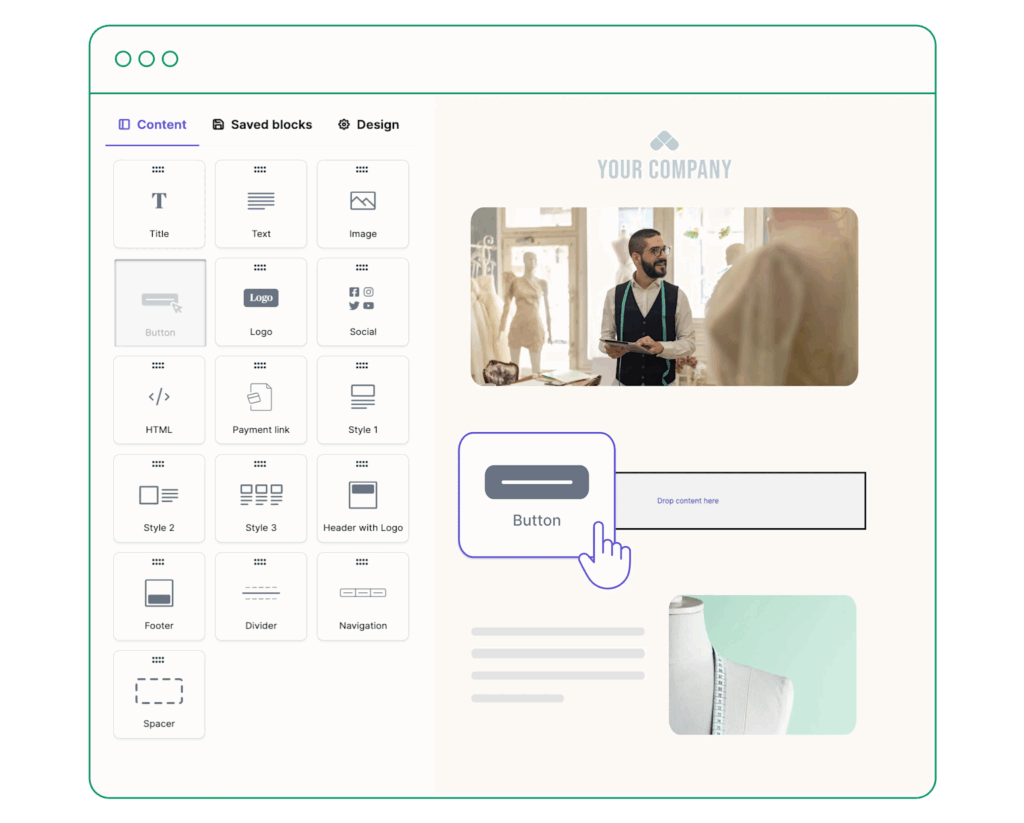
- Email Templates: Tạo email template tái sử dụng với visual drag-and-drop builder sử dụng MJML components và real-time preview.
- Broadcast Campaigns: Gửi marketing email đến segments cụ thể của audience với A/B testing, scheduling, và analytics chi tiết.
- Transactional API: API RESTful để gửi automated email được trigger bởi user action hoặc system event (password reset, order confirmation, v.v.).
- Notification Center: Hệ thống notification center có thể nhúng vào ứng dụng của bạn.
Tính Năng Nổi Bật
- Visual Drag-and-Drop Email Builder: Tạo stunning email với intuitive editor, MJML components và real-time preview. Không cần code để thiết kế email responsive đẹp mắt.
- Unlimited Subscribers & Campaigns: Với self-hosted deployment, bạn không bị giới hạn số lượng subscriber hay campaign như các dịch vụ SaaS thương mại.
- Liquid Templating: Personalize email với Liquid template variables như
{{ contact.first_name }}và custom fields cho dynamic content. - Advanced Contact Management: Rich contact profiles với custom fields, complete activity history bao gồm messages, profile changes, webhook events, và subscription list changes.
- S3 File Manager: Integrated file management với S3 compatible storage cho images, attachments, và CDN delivery.
- Real-time Analytics: Detailed open rates, click tracking, và engagement metrics để optimize campaign.
- Built-in A/B Testing: Optimize newsletter với A/B testing cho subject lines, content, và send times.
- Self-service Subscription Portal: Portal cho contacts để manage subscriptions, preferences, và communication settings.
- Powerful REST API: API cho transactional email với responsive templates để render hoàn hảo trên mọi device.
- Advanced Segmentation: Segment contacts theo property, activity, và subscription. Build dynamic rules với relative dates cho targeted campaigns.
Tại sao nên chọn Notifuse?
So sánh với các giải pháp khác
| Tiêu Chí | Notifuse | Mailchimp | SendGrid | Brevo (Sendinblue) |
|---|---|---|---|---|
| Mã nguồn mở | Có | Không | Không | Không |
| Self-hosted | Có | Không | Không | Không |
| Chi phí | Free (self-host) | Từ $13/tháng | Từ $19.95/tháng | Từ $9/tháng |
| Giới hạn subscriber | Không giới hạn | Theo gói | Theo gói | Theo gói |
| Kiểm soát data | Hoàn toàn | Giới hạn | Giới hạn | Giới hạn |
| Drag-and-drop builder | Có | Có | Có | Có |
| A/B Testing | Có | Có | Có | Có |
| Transactional API | Có | Có | Có | Có |
| Custom domain | Có | Có (paid) | Có | Có |
| MJML support | Có | Không | Không | Không |
| Multi-workspace | Có | Không | Có (paid) | Không |
Use cases phổ biến
- E-commerce: Gửi order confirmation, shipping notification, abandoned cart reminder với cost-effective solution.
- SaaS Applications: Welcome email, password reset, subscription status, feature announcement cho user base.
- Content Publishers: Newsletter cho subscribers với advanced segmentation và A/B testing.
- Educational Platforms: Course enrollment confirmation, assignment deadlines, certificate delivery.
- Non-profit Organizations: Donor communication, event invitation, volunteer coordination với chi phí thấp.
- Agencies: Quản lý email marketing cho nhiều client với workspace isolation.
Yêu cầu hệ thống
Trước khi cài đặt Notifuse, hãy đảm bảo bạn có:
Yêu cầu về cơ sở hạ tầng
- Server: VPS hoặc dedicated server với:
- CPU: 2+ cores (khuyến nghị 4+ cores cho production)
- RAM: 2GB minimum, 4GB+ khuyến nghị
- Storage: 20GB+ SSD
- OS: Linux (Ubuntu 20.04+, Debian 11+, CentOS 8+) hoặc macOS
- Docker: Version 20.10+ và Docker Compose 1.29+ nếu sử dụng Docker deployment.
- PostgreSQL Database: Version 12+ với root credentials (nếu sử dụng standalone Docker). Notifuse tự động tạo system database và workspace database.
- SMTP Server: Notifuse cần SMTP server để gửi system email (password reset, invitation, v.v.). Có thể sử dụng Gmail, Amazon SES, Mailgun, hoặc bất kỳ SMTP provider nào.
- Public API Endpoint: Domain hoặc subdomain public để API accessible từ web (ví dụ:
https://emails.yourcompany.com). - Cron Scheduler: Để trigger automatic email sending, cần setup cron job call
https://YOUR_ENDPOINT/api/cronendpoint mỗi phút.
Tuỳ chọn thêm
- Reverse Proxy: Nginx hoặc Caddy để handle SSL/TLS termination và caching.
- S3-compatible Storage: Để lưu trữ images, attachments với CDN delivery.
- Email Service Provider: Tài khoản với Amazon SES, Mailgun, Postmark, Mailjet hoặc SparkPost để actual email sending với deliverability tốt.
Hướng dẫn cài đặt Notifuse
Notifuse cung cấp nhiều phương thức deployment khác nhau. Chúng ta sẽ đi qua từng option từ đơn giản đến nâng cao.
Option 1: Docker Compose
Đây là cách nhanh nhất để bắt đầu với Notifuse, bao gồm embedded PostgreSQL database.
Bước 1: Cài đặt Docker và Docker Compose
Nếu chưa có Docker, cài đặt trên Ubuntu:
# Update package index
sudo apt update

# Install required packages
sudo apt install -y apt-transport-https ca-certificates curl software-properties-common

# Add Docker GPG key
curl -fsSL https://download.docker.com/linux/ubuntu/gpg | sudo gpg --dearmor -o /usr/share/keyrings/docker-archive-keyring.gpg

# Add Docker repository
echo "deb [arch=$(dpkg --print-architecture) signed-by=/usr/share/keyrings/docker-archive-keyring.gpg] https://download.docker.com/linux/ubuntu $(lsb_release -cs) stable" | sudo tee /etc/apt/sources.list.d/docker.list > /dev/null

# Install Docker
sudo apt update
sudo apt install -y docker-ce docker-ce-cli containerd.io docker-compose-plugin

# Verify installation
docker --version
docker compose version
Bước 2: Download Docker Compose File
# Tạo thư mục cho Notifuse
mkdir -p ~/notifuse
cd ~/notifuse

# Download docker-compose.yml
curl -O https://raw.githubusercontent.com/notifuse/notifuse/main/docker-compose.yml
Bước 3: Cấu hình Environment Variables (Optional)
Tạo file .env để custom configuration (optional, có thể config qua Setup Wizard sau):
nano .envThêm nội dung:
# Database Configuration (Optional - Docker Compose tự động setup)
DB_HOST=postgres
DB_PORT=5432
DB_USER=postgres
DB_PASSWORD=postgres
SECRET_KEY=your_random_secret_key_here

# Application Configuration (Optional - có thể config qua wizard)
[email protected]
API_ENDPOINT=http://localhost:8080

# SMTP Configuration (Optional)
SMTP_HOST=smtp.gmail.com
SMTP_PORT=587
[email protected]
SMTP_PASSWORD=your-app-password
[email protected]
SMTP_FROM_NAME=Your Company

# Server Configuration
SERVER_PORT=8080
LOG_LEVEL=info
Lưu ý: Để generate SECRET_KEY ngẫu nhiên:
openssl rand -base64 32Bước 4: Khởi chạy Notifuse
# Start Notifuse và PostgreSQL
docker compose up -d

# Kiểm tra logs
docker compose logs -f notifuse

# Kiểm tra status
docker compose ps
Notifuse sẽ khởi động trên port 8080 với PostgreSQL database.
Bước 5: Truy cập Setup Wizard
Mở browser và truy cập http://localhost:8080 (hoặc http://your-server-ip:8080 nếu trên remote server).
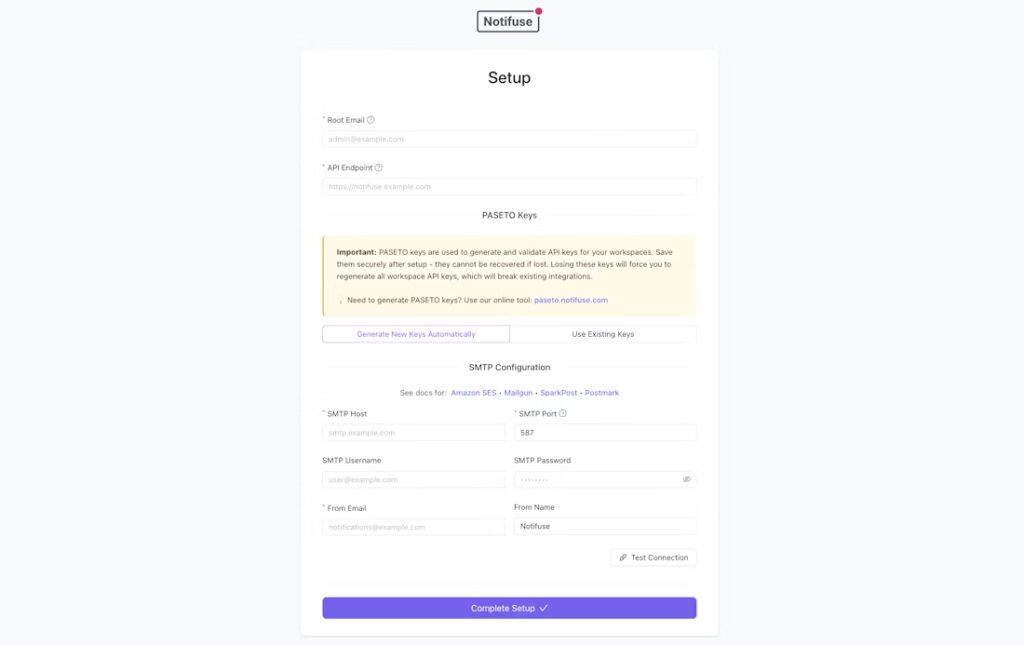
Bạn sẽ thấy Setup Wizard hướng dẫn:
- Enter Root Administrator Email: Nhập email admin (ví dụ:
[email protected]) - Configure API Endpoint: Nhập public API endpoint (ví dụ:
https://emails.yourcompany.com) - Set up SMTP Settings: Nhập thông tin SMTP server cho system email
- PASETO Keys Generation: Wizard tự động generate PASETO keys
- Save Keys Securely: Lưu lại PASETO keys được hiển thị một cách bảo mật
Sau khi hoàn tất wizard, bạn có thể bắt đầu sử dụng Notifuse!
Option 2: Standalone Docker
Cho production deployment, sử dụng standalone Docker image với external PostgreSQL database.
Bước 1: Chuẩn bị PostgreSQL Database
Cài đặt PostgreSQL hoặc sử dụng managed database service:
# Install PostgreSQL trên Ubuntu
sudo apt install postgresql postgresql-contrib

# Tạo database và user
sudo -u postgres psql

-- Trong PostgreSQL prompt:
CREATE USER notifuse_user WITH PASSWORD 'secure_password';
ALTER USER notifuse_user WITH SUPERUSER; -- Notifuse cần root credentials
\q
LƯU Ý QUAN TRỌNG:
Notifuse yêu cầu root credentials vì nó tự động tạo system database và workspace database riêng cho mỗi workspace.Bước 2: Chạy Notifuse Container
docker run -d \
  --name notifuse \
  -p 8080:8080 \
  -e DB_HOST=your_db_host \
  -e DB_PORT=5432 \
  -e DB_USER=notifuse_user \
  -e DB_PASSWORD=secure_password \
  -e SECRET_KEY=$(openssl rand -base64 32) \
  -e API_ENDPOINT=https://emails.yourcompany.com \
  notifuse/notifuse:latest
Truy cập http://your-server-ip:8080 và complete Setup Wizard như Option 1.[^4]
Option 3: Cài đặt từ source code
Cho developer muốn customize hoặc contribute:
Bước 1: Clone Repository
git clone https://github.com/Notifuse/notifuse.git
cd notifuse
Bước 2: Cài đặt Go
Notifuse yêu cầu Go 1.21+:
# Download Go (check latest version)
wget https://go.dev/dl/go1.21.5.linux-amd64.tar.gz

# Extract
sudo tar -C /usr/local -xzf go1.21.5.linux-amd64.tar.gz

# Add to PATH
echo 'export PATH=$PATH:/usr/local/go/bin' >> ~/.bashrc
source ~/.bashrc

# Verify
go version
Bước 3: Build Notifuse
# Install dependencies
go mod download

# Build
make build

# Generate PASETO keys
make keygen
# Hoặc
go run cmd/keygen/main.go
Lưu lại PASETO keys được generate.
Bước 4: Cấu hình và chạy
Tạo file .env:
DB_HOST=localhost
DB_PORT=5432
DB_USER=notifuse_user
DB_PASSWORD=secure_password
SECRET_KEY=your_secret_key
PASETO_PRIVATE_KEY=your_generated_private_key
PASETO_PUBLIC_KEY=your_generated_public_key
API_ENDPOINT=http://localhost:8080
Chạy Notifuse:
# Run
./bin/notifuse

# Hoặc với custom config file
./bin/notifuse -c /path/to/config.env
Setup cron job cho Automatic Email Sending
Notifuse cần cron job để trigger automatic campaign sending:
# Edit crontab
crontab -e

# Thêm dòng sau (chạy mỗi phút)
* * * * * curl https://YOUR_ENDPOINT/api/cron > /dev/null 2>&1
Hoặc thêm cron service vào docker-compose.yml:
cron:
  image: alpine:3.20
  restart: unless-stopped
  depends_on:
    - notifuse
  command: >
    /bin/sh -c "
    apk add --no-cache curl &&
    echo '* * * * * /usr/bin/curl https://YOUR_ENDPOINT/api/cron > /dev/null 2>&1' > /etc/crontabs/root &&
    crond -f -L /dev/stdout
    "
Hướng dẫn sử dụng Notifuse
Tạo workspace đầu tiên
Sau khi login vào Notifuse dashboard, bước đầu tiên là tạo workspace:
- Click “Create Workspace” button
- Nhập workspace name (ví dụ: “My Company”)
- Chọn timezone và default language
- Click “Create”
Mỗi workspace có database riêng và isolation hoàn toàn.
Cấu hình email provider
Để gửi email, bạn cần connect với email service provider:
- Navigate đến Settings > Email Providers
- Click “Add Provider”
- Chọn provider type (Amazon SES, Mailgun, Postmark, Mailjet, SparkPost, hoặc SMTP)
- Nhập API credentials hoặc SMTP settings
- Test connection và save
Ví dụ với Amazon SES:
- Region:
us-east-1 - Access Key ID:
AKIA... - Secret Access Key:
your_secret_key
Ví dụ với Mailgun:
- API Key:
key-... - Domain:
mg.yourdomain.com
Quản lý contacts và lists
Import Contacts
- Navigate đến Contacts
- Click “Import Contacts”
- Upload CSV file với format:
email,first_name,last_name,custom_field1,custom_field2
[email protected],John,Doe,Value1,Value2
[email protected],Jane,Smith,Value3,Value4- Map columns và import
Tạo Contact List
- Click “Create List”
- Nhập list name (ví dụ: “Newsletter Subscribers”)
- Add contacts manually hoặc import từ CSV
- Set list visibility và settings
Segmentation
Tạo dynamic segments:
- Navigate đến Segments
- Click “Create Segment”
- Build rules:
- Property-based:
contact.subscription_date >= 30 days ago - Activity-based:
opened email "Welcome" in last 7 days - Combination: Multiple AND/OR conditions
- Property-based:
- Save segment
Tạo Email Template
Sử sụng Visual Builder
- Navigate đến Templates > “Create Template”
- Chọn “Visual Editor” (MJML-based)
- Drag-and-drop components:
- Title: Header text
- Text: Body content
- Image: Upload hoặc link image
- Button: CTA button
- Divider: Separator
- Social: Social media links
- Customize styling trong “Design” tab
- Add Liquid variables:
Hello {{ contact.first_name }},

Thank you for signing up! Your order #{{ data.order_id }} has been confirmed.

Total: {{ data.total }}- Preview trên desktop/mobile
- Save Template
Sử dụng HTML/MJML Code
Nếu prefer code, chọn “Code Editor”:
<mjml>
  <mj-body>
    <mj-section>
      <mj-column>
        <mj-text font-size="20px" color="#333">
          Hello {{ contact.first_name }}!
        </mj-text>
        <mj-text>
          Your order #{{ data.order_id }} is confirmed.
        </mj-text>
        <mj-button href="{{ data.order_url }}">
          View Order
        </mj-button>
      </mj-column>
    </mj-section>
  </mj-body>
</mjml>
Gửi Broadcast Campaign
- Navigate đến Campaigns > “Create Campaign”
- Campaign Details:
- Name: “Monthly Newsletter – December 2025”
- Subject: “🎄 Special Holiday Offers Inside!”
- Preview text: “Don’t miss our year-end sale”
- Select Template: Chọn template đã tạo
- Select Recipients:
- Chọn list hoặc segment
- Preview recipient count
- Schedule:
- Send now: Immediate
- Schedule: Chọn date/time
- Optimal time: AI-optimized send time
- A/B Testing (optional):
- Test subject lines
- Test content variations
- Set winner criteria và sample size
- Review \& Send
Sử dụng Transactional API
Để gửi transactional email từ application, sử dụng REST API:[^5]
Bước 1: Lấy API Key
- Navigate đến Settings > API Keys
- Click “Generate API Key”
- Copy và lưu key bảo mật
Bước 2: Tạo Transactional Template
- Navigate đến Templates > “Create Template”
- Đặt tên template ID:
password_reset - Design email với Liquid variables:
Hello {{ contact.first_name }},

Click the link below to reset your password:
{{ data.reset_link }}

This link expires in {{ data.expiry_minutes }} minutes.- Save template
Bước 3: Gửi Email Qua API
Node.js Example:
const axios = require('axios');

async function sendPasswordReset(userEmail, resetToken) {
  try {
    const response = await axios.post(
      'https://your-endpoint.com/api/transactional.send',
      {
        workspace_id: 'your_workspace_id',
        notification: {
          id: 'password_reset',
          external_id: `pwd-reset-${userEmail}-${Date.now()}`,
          channels: ['email'],
          contact: {
            email: userEmail,
            first_name: 'John'
          },
          data: {
            reset_link: `https://yourapp.com/reset?token=${resetToken}`,
            expiry_minutes: 30
          },
          email_options: {
            reply_to: '[email protected]'
          }
        }
      },
      {
        headers: {
          'Content-Type': 'application/json',
          'Authorization': `Bearer YOUR_API_KEY`
        }
      }
    );

    console.log('Email sent successfully:', response.data);
  } catch (error) {
    console.error('Error sending email:', error.response?.data || error.message);
  }
}

// Sử dụng
sendPasswordReset('[email protected]', 'abc123token');
Python Example:
import requests
import json
from datetime import datetime

def send_order_confirmation(user_email, order_id, total):
    url = 'https://your-endpoint.com/api/transactional.send'
    headers = {
        'Content-Type': 'application/json',
        'Authorization': 'Bearer YOUR_API_KEY'
    }

    payload = {
        'workspace_id': 'your_workspace_id',
        'notification': {
            'id': 'order_confirmation',
            'external_id': f'order-{order_id}',
            'channels': ['email'],
            'contact': {
                'email': user_email
            },
            'data': {
                'order_id': order_id,
                'total': total,
                'order_date': datetime.now().isoformat()
            },
            'metadata': {
                'source': 'checkout_api',
                'order_id': order_id
            }
        }
    }

    response = requests.post(url, headers=headers, json=payload)

    if response.status_code == 200:
        print(f'Email sent successfully: {response.json()}')
    else:
        print(f'Error: {response.status_code} - {response.text}')

# Sử dụng
send_order_confirmation('[email protected]', 'ORD-12345', '$99.99')
cURL Example:
curl -X POST \
  "https://your-endpoint.com/api/transactional.send" \
  -H "Content-Type: application/json" \
  -H "Authorization: Bearer YOUR_API_KEY" \
  -d '{
    "workspace_id": "your_workspace",
    "notification": {
      "id": "welcome_email",
      "external_id": "welcome-user123",
      "channels": ["email"],
      "contact": {
        "email": "[email protected]",
        "first_name": "Alice"
      },
      "data": {
        "activation_link": "https://yourapp.com/activate?code=xyz789"
      }
    }
  }'
API Parameters quan trọng
| Parameter | Type | Required | Mô Tả |
|---|---|---|---|
workspace_id | string | Yes | Workspace identifier |
notification.id | string | Yes | Template identifier |
notification.external_id | string | No | Unique ID cho deduplication (tránh gửi trùng) |
notification.channels | array | Yes | Phải bao gồm “email” |
notification.contact | object | Yes | Contact object với ít nhất email field |
notification.data | object | No | Template variables cho email content |
notification.metadata | object | No | Tracking data (không available trong template) |
notification.email_options | object | No | Email routing (reply_to, cc, bcc)[^5] |
External ID Deduplication: Sử dụng external_id để đảm bảo email chỉ được gửi một lần dù API được call nhiều lần:[^5]
// Email này chỉ gửi 1 lần dù retry nhiều lần
external_id: `order-${orderId}-confirmation`
Theo dõi Analytics
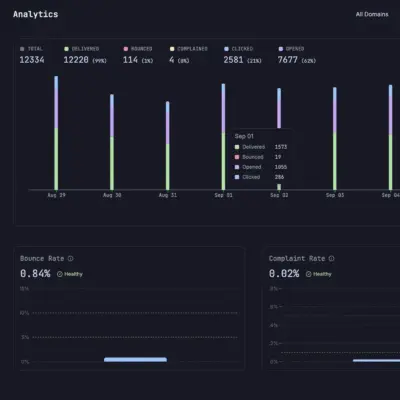
- Navigate đến Analytics dashboard
- View metrics:
- Sent: Tổng số email đã gửi
- Delivered: Email delivered thành công
- Opened: Open rate (%)
- Clicked: Click-through rate (%)
- Bounced: Bounce rate
- Unsubscribed: Unsubscribe rate
- Filter theo:
- Date range
- Campaign
- Segment
- Email provider
- Export reports dạng CSV
Lỗi thường gặp
Issue 1: Container không start
Triệu chứng: docker compose up fails hoặc container exit ngay lập tức.
Giải pháp:
- Check logs:
docker compose logs notifuse - Verify port 8080 không bị chiếm:
lsof -i :8080(macOS/Linux) hoặcnetstat -ano | findstr :8080(Windows) - Ensure PostgreSQL khởi động trước Notifuse: thêm
depends_ontrong docker-compose.yml - Check database connection settings trong
.env
Issue 2: Setup Wizard không xuất hiện
Triệu chứng: Truy cập http://localhost:8080 nhưng không thấy wizard.
Giải pháp:
- Check container status:
docker compose ps - Verify logs:
docker compose logs -f notifuse - Clear browser cache và retry
- Ensure
API_ENDPOINTvariable chưa được set (wizard chỉ xuất hiện lần đầu)[^4]
Issue 3: Email không được gửi
Triệu chứng: API call thành công nhưng email không đến recipient.
Giải pháp:
- Check SMTP settings: Verify username, password, host, port
- Test SMTP connection: Sử dụng telnet hoặc tool như MailHog để test
- Check spam folder: Email có thể bị classify là spam
- Verify email provider credentials: API key còn valid không
- Check cron job: Ensure cron đang chạy và call
/api/cronmỗi phút[^4] - Review logs: Check application logs cho error message
Issue 4: Database Connection Failed
Triệu chứng: Error “cannot connect to database” trong logs.
Giải pháp:
- Verify PostgreSQL đang chạy:
sudo systemctl status postgresql - Check database credentials trong
.env - Ensure database user có SUPERUSER privileges (Notifuse yêu cầu)
- Test connection manually:
psql -h localhost -U notifuse_user -d postgres- Check firewall không block port 5432
Issue 5: PASETO Key Issues
Triệu chứng: Authentication errors hoặc “invalid token” messages.
Giải pháp:
- Ensure PASETO keys được generate correctly
- Re-generate keys:
make keygen
# Hoặc
go run cmd/keygen/main.go- Copy keys chính xác vào environment variables
- Restart Notifuse sau khi update keys
Issue 6: Cron job không trigger campaign
Triệu chứng: Scheduled campaign không được gửi automatically.
Giải pháp:
- Verify cron job đang chạy:
crontab -l - Test endpoint manually:
curl https://YOUR_ENDPOINT/api/cron- Check cron logs:
grep CRON /var/log/syslog - Ensure endpoint accessible từ cron execution context
- Verify campaign có status “scheduled” không phải “draft”
Best Practices
Security Best Practices
- Sử dụng Strong Passwords: Generate random password cho database và secret keys:
openssl rand -base64 32- Enable SSL/TLS: Luôn sử dụng HTTPS cho production deployment. Setup reverse proxy với Let’s Encrypt certificate.
- Restrict Database Access: Chỉ allow connection từ Notifuse server, không expose PostgreSQL ra public.
- Rotate API Keys Regularly: Định kỳ rotate API keys và revoke keys không sử dụng.
- Environment Variables: Store sensitive data trong environment variables, không commit vào Git.
- Backup Regularly: Backup PostgreSQL database và configuration files định kỳ.
Performance Optimization
- Use Connection Pooling: PostgreSQL connection pooling giúp handle high load tốt hơn.
- Enable Caching: Sử dụng Redis cache cho frequently accessed data (optional feature).
- Optimize Images: Compress images trước khi upload vào email template.
- Monitor Resource Usage: Track CPU, RAM, disk usage để scale timely.
- Load Balancing: Deploy multiple Notifuse instances behind load balancer cho high availability.
Email Deliverability Tips
- Warm Up Email Domain: Gradually tăng sending volume khi mới setup domain.
- Authenticate Domain: Setup SPF, DKIM, DMARC records đúng cách.
- Clean Contact Lists: Regularly remove bounced và inactive contacts.
- Monitor Engagement: Track open/click rates, unsubscribe khi engagement thấp.
- Test Before Sending: Luôn gửi test email trước khi launch campaign.
Notifuse đại diện cho một bước tiến quan trọng trong democratization của email marketing và notification infrastructure. Với khả năng self-host, không giới hạn subscriber, và tính năng enterprise-grade hoàn toàn miễn phí, Notifuse đang thách thức các SaaS platform thương mại đắt đỏ và mang lại quyền kiểm soát hoàn toàn cho developer và doanh nghiệp.
Trong thời đại cloud-first và SaaS dominance, Notifuse nhắc nhở chúng ta rằng open-source, self-hosted solutions vẫn có một vị trí quan trọng – đặc biệt khi nói đến data privacy, cost optimization và long-term sustainability. Khả năng deploy một email marketing platform đầy đủ tính năng mà không phải trả subscription fee hàng tháng là một lợi thế competitive lớn cho startups và SMEs.
Cho dù bạn đang xây dựng SaaS application, e-commerce store, content platform hay bất kỳ service nào cần gửi email, Notifuse cung cấp foundation vững chắc để scale notification infrastructure của bạn without breaking the bank. Self-hosting đồng nghĩa với việc bạn control destiny của mình – và trong world of recurring SaaS subscriptions, đó là một điều vô cùng quý giá.